Final(ly)! Mill Session 10

We all worked very hard this week to finish our project, and below is the final result!

Responsibilities:

Here is a very thorough list of all of the responsibilities of The Spice Girls (to my knowledge):

Clarissa: Concept, set dressing (done together with Luke), modeling and texturing for boxes, texturing car in shots 1 and 2, modeling and texturing jars, texturing hand mixer, modeling and texturing glass bowl, modeling and texturing frosting, partial car animation of shot 1 (Luke helped me with timing), finalized car animation in shot 2 (Luke did a rough first pass), setting up render layers for shots 1 and 2 (I set up my own), lining up footage and geometry for shots 1 and 2, lighting shots 1 and 2 (with HDR of Luke’s), rendering shots 1 and 2, rendering all shadows (including those of the packing peanuts) for shots 1 and 2, partial compositing for shots 1 and 2 (Aberdeen helped composite her packing peanuts). When compositing the packing peanuts, Aberdeen plugged them all in. We both then worked on color corrections and grading together, as well as other issues like premulting and rotoscoping out issues.

Luke: Concept, shot backplate for all shots (everyone else was there to help but he shot it), shot HDR, tracked all footage, color correcting all footage, photoscanning kitchen (helpful for set dressing), set dressing (done together with me), rigging car, texturing car in shot 3, modeling and texturing egg, modeling and texturing egg carton, modeling and texturing butter, modeling and texturing spatula, texturing hand soap, modeling and texturing cake pans, helping me with the timing of my animation in shot 1, rough first pass of car animation in shot 2, car animation in shot 3, setting up render layers for shot 3, lining up footage and geometry for shot 3, lighting for shot 3, rendering shot 3, compositing shot 3.

Jared: Concept, modeling and look development on chocolate chips (and flour when we had that), simulating flour and chocolate chips, FX on flour and chocolate chips, pipeline work between Houdini and Maya for chocolate chips, writing out chocolate chips as .ass files so they can be brought into Maya (and therefore make them easier to render with the glass bowl), changing chocolate chips from Mantra shaders in Houdini to Arnold Houdini shaders so they can be brought into Maya.

Aberdeen: Concept, modeling and look development for packing peanuts, lighting for packing peanuts in shots 1 and 2, simulating packing peanuts, FX on packing peanuts, writing out packing peanuts in shots 1 and 2 as .ass files for me to bring into Maya to render their shadows, rendering packing peanuts, partial compositing of packing peanuts for shots 1 and 2.

My Render Layers for Shot 1:

Please click on the images to make them bigger. These do not include Aberdeen’s packing peanuts, because she is responsible for those.

These layers are, left to right:

Top: Beauty, Shadow Mask, Shadow (the final look in Nuke)

Bottom: Reflection Mask, Reflection Beauty, Reflection (the final look in Nuke)

Node Tree for Shot 1:

Please click on the images to make them bigger.

My Render Layers for Shot 2:

Please click on the images to make them bigger. These do not include Aberdeen’s packing peanuts, because she is responsible for those.

These layers are, left to right:

Top: Beauty, Shadow Mask, Shadow (the final look in Nuke)

Bottom: Reflection Mask, Reflection Beauty

My Node Tree for Shot 2:

Please click on the images to make them bigger.

Mill Session 9

Below is the video that we are presenting to The Mill for Session 9:

Password=sdgm560

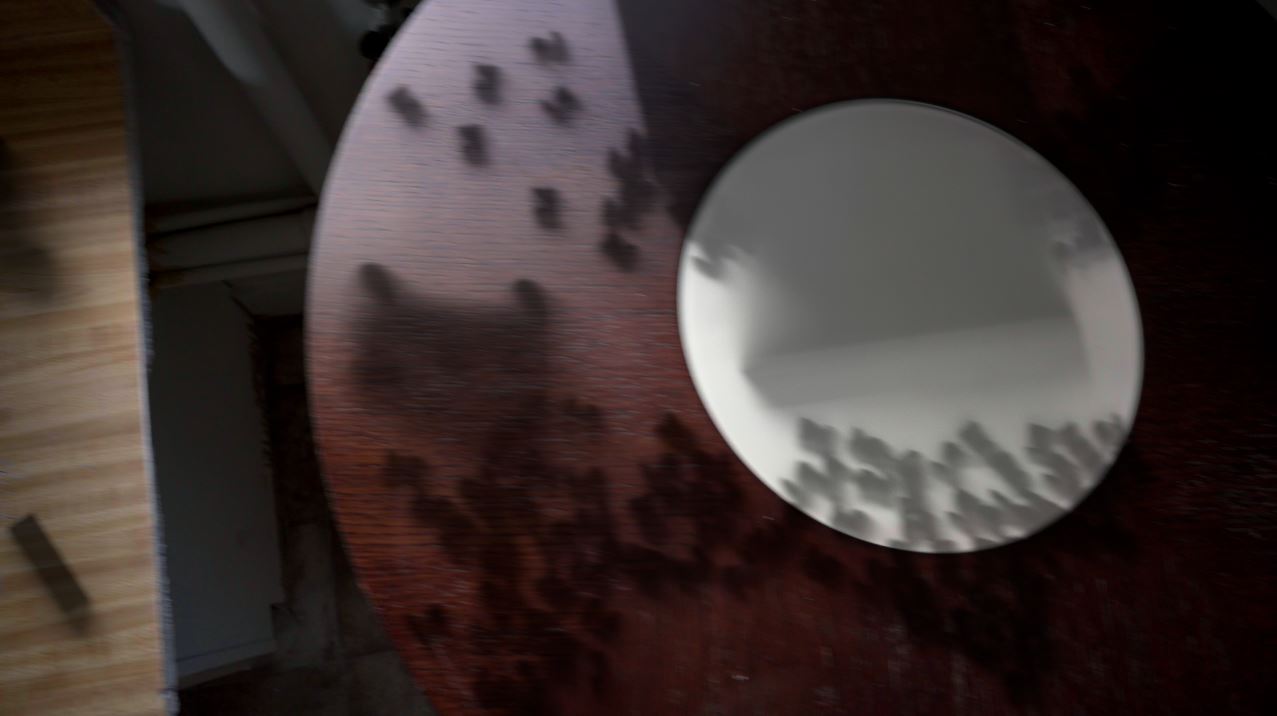
Below are some still frames showing that I fixed up the reflection and car shininess in this video, as well as rotopainting the box where the packing peanuts overlapped it:

Edit-we were having troubles lining up the car from Maya and the packing peanuts from Houdini, as seen in the picture above. Turns out it was just that Aberdeen wasn’t using the most recent car animation! Below is a clearer before and after (click to make bigger):

Lots of Compositing

The main focus this weekend is on compositing our shots. Of course, we still have tweaks to do before getting our final renders out, but for the most part, it’s all about compositing. First, I got rid of Luke’s render layer system in my shot, because I just could not wrap my head around it. So all of the render layer passes that I am comping currently are all mine. Aberdeen is helping me comp in her packing peanut passes. Below is a video showing the latest versions of Shot 1:

Password=sdgm560

The first part of the video is the latest version. It includes a reflection on the table of the boxes and car, lightened shadows, lightening of the black parts of the car, and roto work to make the packing peanuts that fall off the edge of the table be darker. The second part of the video is the same, but without the shadows, since I do not have all of those rendered yet.

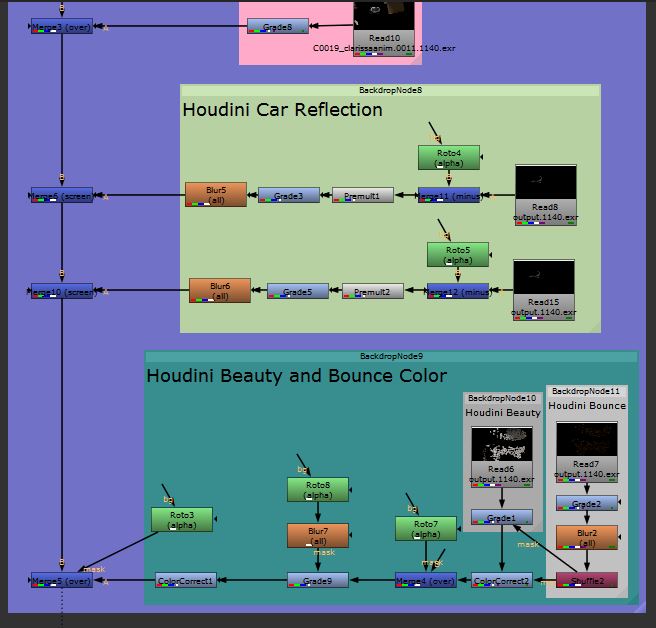
Below is me and Aberdeen’s node tree. Please click on the images to make them larger:

Here is the to-do list on this shot for the rest of the weekend:

-fix the boxes. Bridget said that their edges are too straight

-make the tires of the car even lighter-they’re still too dark

-tint the boxes and car to be a bit pink, to match the pink-ish color on the plate. Bridget said that I can do this with a direct AOV

-work on my DOF-especially make sure it matches the DOF on the packing peanuts

-packing peanuts reflections

-the packing peanuts on the inside of the box need to be darker, like they are in the shadow of the box (because they are)

I also need to work on comping and finalizing Shot 2 at some point in my life.

Mill Session 8

Here is the video that the Spice Girls will be showing to The Mill for Session 8:

Password=sdgm560

While we all worked really hard this week, Luke helped a lot by setting up our render layers and AOVs. Below are the node trees for Shots 1 and 2:

And here is a more recent version of Shot 1, with more of a reflection visible on the table:

Password=sdgm560

I have no idea why it disappears when it goes to the right, and then suddenly reappears again when it gets closer to the box.

Solving Line-Up Issue, Modeling and Texturing Box, and Getting Ready to Comp

For the top-down shot (which is officially C0019), I had trouble lining up the footage and geometry. Either it was lined up in the beginning and not in the end, or vice-versa, as shown below:

Beginning

End

With help from Bridget, we figured out that it was because the Maya geometry was not properly lined up with the point cloud that was exported with the camera from Nuke!

The table was a little too low

The table was a little too low

So I messed around with the geometry, and was finally able to get everything to line up throughout the whole scene!

Beginning

End (I fixed the car intersecting through the bowl problem)

Here is a video showing that it holds up, both with and without the Maya geo:

Password=sdgm560

I also finalized the box model from the first shot, and added textures to it. A turntable can be seen below:

Password=sdgm560

I took the texture photos myself, since there’s really a lack of decent cardboard texture images online. Hopefully it’s fine? The box I took texture photos of was mostly smooth, but I put a bit of a bump on mine to make it look more like a texture and less like a plain shader.

Finally, we have all been working on setting up render layers and AOVs for our final render. Below is a first pass of my shot, with beauty and shadow render layers:

Password=sdgm560

For some reason, I’m having trouble with my reflection render layer:

uh.JPG

I’m really not sure what is causing that gray to overlap the car. Here is my node tree:

On the left is my shadow pass, above is my beauty pass, on the right is my beauty reflection pass, and on the far right is my reflection pass, with an alpha shuffled out.

Additionally, the reflections on the car windows are just off because I accidentally used the old, not color corrected footage instead of the newer footage. Here it is with the color corrected footage:

Animating New Shot

The Mill liked edit option 1, with the top-down shot addition. Luke tracked that shot, and I finalized the animation, which can be seen below:

Password=sdgm560

Here is the reference that I used for it:

I leaned the car back-first because the battery of a Twizy is at the bottom, towards the back, so that is where the weight would be distributed to in a fall.

Additionally, we solved some of the problems from yesterday! First of all, the car wasn’t rendering with textures on the Farm because I forgot to put the updated rig file (with the textures) into the assets folder on the Farm. Then, our Houdini to Maya camera wasn’t lining up in shot 1 because of a stepping issue. When exporting alembics, there is an option for stepping. When we cranked that option to 10, it worked and the cameras lined up correctly.

Mill Session 7

Here is the video that we are presenting to The Mill for session 7, October 24:

Password=sdgm560

We have been working on our animation, cameras (tracking, matching in Nuke, and so on), comping, and our Maya to Houdini workflow, and added in extra shots, as per The Mill’s request.

Below are single-frame renders from shots 1 and 2 (our main shots):

For some reason, locally rendering will work fine with rendering the car textures. However, when I try to render on the RenderFarm, the car textures disappear.

For the car textures, I unfortunately had them in a separate file from the final rig file that we are referencing into our scene. This is because me and Luke were trying to keep our shaders separate, since we needed to each have our own turn tables. So, I exported all of my textures from the hypershade as .ma’s, and imported them into the hypershade of the rig file that we are using.

I have tried to putting the .ma’s in many different locations, to see where the Farm will support it. This includes the assets folder, inside the rig folder, and even on the very top level. None of these have worked.

Another issue that we are having is with lining up me and Aberdeen’s renders. Below shows how off they are. The pink ones are Aberdeen’s. and the gray ones are mine.

We are not sure why they do line up perfectly; I exported everything, including the camera, straight out of Maya as a .abc, and also a .fbx, for Aberdeen. We even made sure that the information, such as focal length, were the same between the two files.

For next week, not only do we need to fix the problems mentioned above, but we also have to work more towards finalizing the comp. This includes lining up the footage better, since it is slightly off in some shots, finalizing lighting. and also color correcting the footage so that it all looks consistent throughout. Additionally, I am in charge of modeling and texturing the boxes in the beginning. That has not been done yet because we were waiting to see what types of boxes would best work for Aberdeen’s sim. I also just realized that my animation in the beggining is ever so slightly off-the tires clip through the table a bit. I think that our main priority is polishing the Maya to Houdini workflow that we have. One of my bigger priorities is also modeling and texturing the boxes, so that we don’t have such important assets be incomplete.

Mill Session 6

Based on feedback from The Mill last week, me and Luke decided to focus on adding more details to the textures of our assets. Below is the work that I have to show the Mill for Session 6:

Password=sdgm560

It’s mostly the same from the last blog post about texturing-I lessened the amount of smearing on the metal parts of the hand mixer, fixed up the models and UVs of the measuring cups, and fixed up a slight UV issue on the frosting. I still have not finished the sugar and flour jars-I’m having trouble getting specular roughness to show up on the white of those jars.

Hypershade and Textures

Please click on the images to make them bigger.

Glass Bowl

Here are my hypershade network and shader attributes for the glass bowl:

Here is the specular roughness map that I used:

Here is a detail of the smudges on the bowl, since they don’t seem as apparent on the gray background of the turntable :( :

Hand Mixer

Here are my hypershade network and shader attributes for the metal mixers of the hand mixer, since they’re the only part I’ve changed:

Here is the specular roughness map that I used:

And here is a detail of the mixers, this time because they seem to be too small in the turntable to really see the smears :( :

Measuring Cups

Here are my hypershade network and shader attributes for the measuring cups:

Here is the specular roughness map that I used to get the spots on the measuring cups:

Frosting

Here are references for the frosting:

Here are my hypershade networks and shader attributes for the lid, the wrapper, the plastic part of the can, and the chocolate frosting inside (with the first 2 being for the lid):

Here is the bump map that I used to get the logo on the lid:

I still think that I need to reverse the colors so that I can get the opposite effect.I’ll need to study my actual can of frosting more, but I think the spoon is actually supposed to rise instead of sink? This is why real life reference is so important-I can’t really tell in the photos online. I also just realized that I made this a bump map and not a displacement; I wonder if making it a displacement would help at all?

Here is my texture for the wrapper, which I scanned in from a real frosting wrapper:

For next week, I want to improve textures, figure out the problems with the flour and sugar jars, and lock down the animation for my shot. The animation will take highest priority this weekend, since that needs to be finished for the FX.

Animating and Texturing

Luke and I each took a shot to work on finalizing the animation more. I took Shot 1. I sped up the camera, and sped up the car animation. I also added a second box underneath the main box, since Aberdeen wanted the main box to be elevated. She said that, this way, the packing peanuts came out in a more dramatic way.

Password=sdgm560

Since The Mill told us to create textures with more imperfections, I have been working on those. So far, I am responsible for the bowl, the handmixer, the sugar and flour jars, the frosting, and the measuring cups. Please click on the images to make them larger.

Right now, I’m very worried about how subtle all of the imperfections of the textures look. For instance, on the bowl, there are definitely smudges, most noticeable on the right side. But I’m worried they’ll be hard to see unless you’re really looking for them.

I’m also unsure if I will add any stains to the white part of the hand mixer. It’d probably be best to get around to it since, realistically, I think there would be stains in the crevices of it.

The frosting can is fine, since a new, unopened can of frosting would not be dirty. I’m probably going to take a picture of the lid of the frosting that I have and project paint that logo onto my CG lid.

For the measuring cups, I need to improve the surface break-ups to the handles. I can see it in the viewport, but it seems to render just a matte black.

I still need to do the flour and sugar jars.

Again, I’m still very worried that all of these texture imperfections will be too subtle.

Mill Session 5 and More Models

Here is what we showed The Mill on the 10th:

Password=sdgm560

Over the week, Luke and I worked together to set dress our environment. Everything is modeled to real word scale. Luke was somehow able to do all of the tracking.

Our main feedback from The Mill was to begin making the textures imperfect. This includes smudges and scratches; they said that right now everything is too clean.

Before beginning to texture, I finished modeling the new assets that we made today. These are cake pans, a can of frosting, and hand soap. We placed these at the other end of the sink; in the above video, they are just very basic proxy geometry. I got the hand soap from CGTrader.

For these new assets, we decided that Luke will texture the cake pan and hand soap, and that I will texture the frosting can. This way, we will both have an even number of CG assets to be in charge of. Today, I also began to texture the can of frosting:

I bought a can of frosting and scanned in the label to get that texture, since I couldn’t find a good quality label online. I’m still working on the Betty Crocker logo on the lid; I think that right now I have the displacement on it backwards. I also need to study the lid of the frosting that I have, to see how shiny it is. The reference pictures online all have conflicting levels of shininess.

On top of those things, I need to add smudges and fingerprints to the hand mixer, the mixing bowl, the measuring cups, and the sugar and flour jars by this coming Wednesday.

Set Dressing and Test Comp

Today the Spice Girls met up to begin set dressing for our project. We used Luke’s photoscan of the kitchen to place the objects we had made last week (the hand mixer, bowl, measuring cups, eggs, butter, and spatula). We did our best to place them where we thought made sense and felt natural, and not in a way that looked like it was placed there for our convenience. For instance, we put the hand mixer near the bowl, and positioned how we thought it would look if someone set it down for a bit.

We then imported the camera for shot 3, and did a test comp of that shot:

Password=sdgm560

This is just the basic blocking, with no textures, except for the glass texture of the bowl. The first pass of it shows it at the actual speed the footage was shot at, and the current speed that the car is going. The second pass is sped up, but roughly shows what speed we want the car to drive at (so the car going that fast, not the footage). We modeled everything to scale.

We need to fix the speed of the car to be faster, and add some more CG assets at the sink and on the other side of the sink to fill that empty space. I’m a bit worried that the placement of the bowl and the butter will block the flour shot too much, since the flour will be around that area, but we’re going to see how it looks with the flour once we get a mesh for that, and go from there.

More Tracking

Somehow Luke was able to get a decently working track out of our footage, because he is a VSFX genie. So, I took the .fbx camera from his track of shot 2 and brought it into Maya. This way, I could test our workflow between Maya and Nuke, and also see if the Maya geometry would work with the track. Below is my test:

Password=sdgm560

The test geometry I used was 2 cubes and 1 plane, and they are black because I didn’t bother putting shaders on them or lights in the scene. Also, there is a jump because of missing EXRs. But we all agree that it looks like the track is working! Because Luke is a VSFX genie.

So, our next steps would be to begin set dressing with the geometry we made last week. We’re thinking about getting together tomorrow to set dress together.

Nuke Camera Tracking

One of the biggest outtakes we got from our last Mill presentation was that it’s time to start adding our CG assets into our scene, and begin set dressing the scene. So the Spice Girls have been attempting to track the camera in our footage. However, it’s been proving really difficult since we cleared the kitchen counter to film. Because of this, there isn’t really anything for Nuke to track, and we didn’t think to bring camera trackers to our set when we filmed. So we’ve been having really bad sliding problems.

We all worked together on tracking on Monday and Wednesday, and split up the shots individually for the weekend. I got shot 2, with the car circling around the table. Below are my very unsuccessful tracking attempts (please don’t mind the poorly rotated cards-among other things, I struggled to rotate them correctly):

Password=sdgm560

I was able to bring the first test to a Solve Error of 3.65, the second to a Solve Error of 1.7, and the third to a Solve Error of 0.67. I feel like the first test’s Solve Error was too high, but that the last one was too low for the track to track anything. Before tracking, I color corrected the s-log footage, and I added grade and sharpen nodes to the footage so that the footage would have more contrasts for the track to pick up on.

I’m not entirely sure where to go from here to fix this problem. I’m going to ask my group and possibly some professors for help when I can. If none of us can figure this out, then it seems the Spice Girls will have to reshoot our footage with trackers this time :(

CG Assets

For our last presentation, The Mill told us that, instead of having some real life objects in our footage, to shoot a clean kitchen counter, and add CG assets onto it to fill it up. The Mill also did not like our birthday party idea; they believed that the story wasn’t strong enough.

With all this in mind, the Spice Girls decided to change our story a bit. So now, a person is baking a cake for a birthday, and had to leave in the middle of baking. While that person is out of the kitchen, the toy car (which is one of the birthday presents) comes to life and drives around the kitchen.

Below is the video that we will be presenting to The Mill tomorrow. The footage in it has not been color corrected. It also includes the elements that I am responsible for. I modeled and textured everything, except for the hand mixer. The hand mixer model is from www.cgtrader.com, and the textures for it come from www.cgtrader.com as well. I am only responsible for the shading on the hand mixer.

Password=sdgm560

Hypershade and Textures

Please click on the images to make them bigger.

Hand Mixer

Here are references for the hand mixer:

Here are my Hypershade networks and shader attributes for the main white part, the gray buttons, and the metal mixers:

Measuring Cups

References for the measuring cups:

My Hypershade networks and shader attributes for the cup part and the handles. Each handle is different, with a different measurement, but they are all formatted the same:

I also used displacement to get the measurement words to sink into the handles. The attributes for those all look like this:

And here are what my displacement shaders look like for the handles:

Mixing Bowl

Below are my references for the mixing bowl:

The following image shows my Hypershade network and shader attributes for the mixing bowl:

Sugar and Flour Jars

These are the references that I used for the sugar and flour jars:

Here is my shader network for the jars (they are both identical except for the words “Sugar” and “Flour”:

Additionally, I used displacement on both of them:

Here are the displacement textures that I used:

To move forward, Luke and I still have some CG assets left to model and texture. I still need to model and texture the box that the car comes out of; me and Aberdeen are working back and forth to get the box model to match between Houdini and Maya, so as not to mess up Aberdeen’s packing peanuts simulation. We also need to model an egg carton, and possibly other various kitchen items, such as hand soap, depending on how the shots look in the camera. We would also like to color correct our test footage and do some test comps.

Mill Session 3 Progress and Hypershade Networks

The Spice Girls have been very busy this week getting everything ready for our third session with The Mill. Below is the video that we will show them during our next video conference:


Password=sdgm560

The video showcases me and Luke’s Look Development Rigs, Jared and Aberdeen’s FX tests, our kitchen 3D scans and track test, and our cut footage. However, we have not color corrected the footage yet. We included the main 2 shots that we would like to do, and an extended cut that we feel adds to the story.

Hypershade and Textures

Please click on the images to make them bigger.

Interior

Here is the main reference that I used to help me texture the interior of the car:

Here are my Hypershade networks and shader attributes for the steering wheel, dashboard, car seats, and interior walls:

Shell

Here are the references that I used for the main body of the car, or the shell. This includes one picture that I took myself of a similar car:

Here are my Hypershade networks and shader attributes for the white part of the body, the black on the top and door, the tinted glass under the door, and the large black part on the bottom:

Here are my references for the smaller parts of the body, including the windshield and logo decal:

Here are my Hypershade networks and shader attributes for the windshield, windshield wiper, black outline part on the windshield, black part of the decal, and the decal:

Lights

Below are my reference images for the lights of the car. There are two white front headlights, four orange lights (two in front and two in back), and one long red light, with a smaller white light in the center. The last one is a picture that I took myself of a similar car and similar light:

These are my Hypershade networks and shader attributes for the headlights, orange lights, and red back lights:

Tires

These are some of the reference images that I used to help me texture my tires:

The tires of a Twizy involve tire covers (the black part on top of the tire), the rubber of the tire itself, a white covering, and springs and other bits to help hold it all together. These are my Hypershade networks and shader attributes for the tire covers, tire rubber part, white covering, and springs:

Additionally, I switched the HDR I was using. Luke noticed that the HDR I had didn’t have a direct light source, so we switched mine to one with a more direct light source. Here it is below:

hdr.jpg

Look Development Update

Today my group and I met up to begin cutting the footage together. We are still working on it, but have a rough idea of what we want. Our conclusion was that we need to edit down a bit. The requirement is 2 shots, which in itself is a challenge. Our rough cut at the moment is 8 shots, with 6 of them requiring CG assets. We are currently editing down to something more manageable.

I also got feedback from my team on my Light Rig. Below is the updated version:

Password=sdgm560

For some reason, SCAD’s RenderFarm is still rendering a few frames with an “arnold” watermark. I would like to ask one of the professors about that tomorrow.

Luke helped me find good references. There are apparently reference videos of this car in motion, which really helps with the textures. Below is the reference video that I used:

We decided to make the car have black accents instead of blue, to match more references that Luke found. My team said that a lot of my car was too shiny, so I toned that down, and I fixed the HDR up a bit as well. Finally, I fixed the headlight and brake light problem! It turns out that I had “Opaque” checked on the mesh, so I unchecked that (thanks Luke). It’s still probably not perfect, but definitely on the right track now.

Beginning of Filming and Look Development Light Rig Part 2

Today my team and I all went to the kitchen of Jared’s girlfriend to film. We took many shots, both with the toy car for reference and without it, for clean plates. Below shows my edit of all of the footage we shot. It includes a mixture of shots with the toy and clean shots; we’re definitely going to have to redo some shots. But this is the basic composition and layout that I thought worked best out of what we shot. Keep in mind that we shot this in log, so the color is flat. I did not color correct in Da Vinci yet, like Luke said to, because I’m a bit unsure about how to do it. However, I hope Luke will show me, and then the above cut will have actually decent colors.

Password=sdgm560

When we went there, we saw that Jared had tiny birthday hats from his birthday a few days ago! We thought it would be cute to use those, and scattered them throughout the scene, along with cake mix. We decided this would add a new element to the story-that the driver (the white bear at 00:18) is going to his birthday party!

Password=sdgm560

I also updated my light rig. I tweaked the existing textures, and textured the interior of the car as well. The current HDR is one from the kitchen we shot in today. Unfortunately, I still can’t seem to correctly texture the headlights and break lights though. (Please keep in mind that the flash/glitch at 00:05 is a watermark saying “arnold”. I guess SCAD’s Renderfarm renders with that now?) I included a material quilt as well, with every texture on my car. Below is what the HDR looks like:

_DSC6945 Panorama_hdr_4k.jpg

Look Development Light Rig Part 1

We ended up going with my toy car idea but, instead of being outside, it is going to be in a kitchen (Aberdeen’s idea). We got a car model from TurboSquid, and now our job is to focus on texturing it and creating a light rig for it. I created a basic first pass of the light rig here.


Password=sdgm560

I am currently using an HDR that I shot myself for another project. This is just a placeholder HDR, and I plan to change it to one of the kitchen we will be using once my group and I shoot there this weekend.

This is a Twizy car, and it is very unusual. This makes it a bit difficult to texture, since I’m not at all familiar with this car, and do not know where to find a real one for reference. However, Luke found and bought an actual Twizy toy car, so that will be useful not only for shooting reference, but also texture reference, so I plan to make improvements to my textures when I get to see the toy car.

Here are the photo references that I was using to help me texture:


$_86.JPG
download.jpg
renault-twizy-7.jpg
twizy_2.jpg

While these photo references are definitely helpful, there are so many tiny parts in the Twizy model, and it’s hard to see what those textures look like in the pictures. Therefore, I really want to get the actual Twizy toy car as soon as I can, especially since we’re doing a toy car in our shots anyway.

I am having problems texturing the headlights and brake lights. I used a glass preset, and then tweaked it to show color. However, it is very dark and dull for some reason, and I am hoping to fix the problem as soon as I can.


lightproblem_front.jpg
lightproblem_back.jpg

This weekend I plan to continue working on the light rig, improving my textures, and also my team and I are going to shoot our plates this weekend.

Reference Images

For this project, the requirements are to have at least 2 shots of a car, and have some effects to go with it. To begin coming up with ideas, first I looked on the internet at car commercials.


One of the first things I noticed is that one of the main particles in most of these commercials is dust, so having that as a particle seems fairly unavoidable. Some inspiring parts of these commercials include the third one on the first video (around the 3:30 mark), where a guy drives against obstacles popping up in the road. That includes debris particles, and seemed interesting.

nissan-skyline-road-nissan.jpg

Another interesting idea for particles would be sparks. I’m not sure exactly what would cause sparks, but perhaps very fast driving, or a broken down car?


While thinking about ideas, I also wondered, why have a real car? It could also be a photorealistic toy car! Like this Barbie commercial:


I think it would be cute to have a toy car in the real world-so everything, even blades of grass, would look huge next to it. This could lead to interesting, bigger dust particles (like maybe a ball fell on the grass and the toy car is trying to escape?), or even just grass blowing. I like creative ideas like this based off of this commercial:

I’ve also been looking at car models from cgtrader.com and turbosquid.com, but am holding off on making a decision until I get put into a group.